Last month I was at a cousin's wedding. I'm looking for a nice hairdo. Unfortunately, I can't do fancy things with my hair. My friend said try the fishtail braid hairstyle. I told him it's too difficult, she laughed, she demonstrated the secret to me two parts,thin strands. Go across, left to right, cross right to left.
That is all. I did work out three times on the day of the wedding time was five minutes all asked who did my hair. I did it myself, I told you so. This article will teach you the same simple steps. No salon needed It only takes 5 minutes and a comb.
What Is a Fishtail Braid?
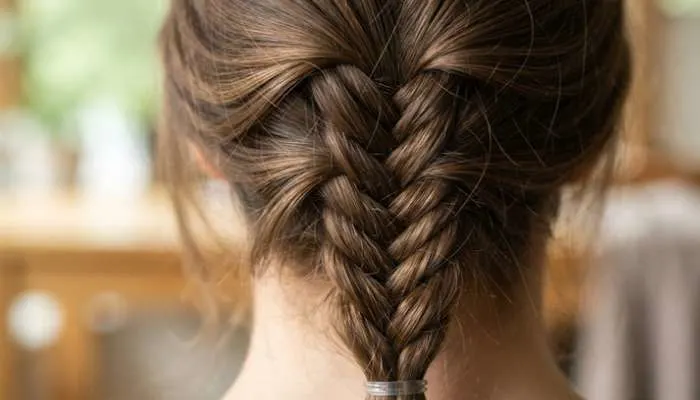
A fishtail braid is a braid made from two parts. Normal braids use three parts. This one uses two. You take small strands from the outside. You cross them to the other side. The braid looks like a fish tail. That is why it has this name.
It looks fancy. People think it is hard. But it is not. It is actually easier than a normal braid for some people. You just need patience for the first two tries.
Read More: Date Night Hairstyles for Girls: Easy Styles for Every Hair Length
Fishtail Braid Hairstyle for Ladies
This style suits all ladies. It works on long hair. It works on medium hair. It works on straight hair. It works on wavy hair. It even works on curly hair if you stretch the curls first.
Here is why ladies love it:
- It looks elegant. Good for weddings and functions.
- It stays all day. Does not come loose.
- It hides dirty hair. Great for day three hair.
- It works with any outfit. Saree, suit, jeans, dress - all fine.
- It looks thick. The braid makes hair look fuller.
You can wear it as a side braid. You can wear it at the back. You can make it tight or loose. Loose looks soft. Tight looks neat.
Fishtail Braid Step by Step
Follow these steps slowly. Do not rush. First two times will be messy. Third time will be better. By the fifth time, you will do it without thinking.
Step 1: Brush Your Hair
Brush all your hair. Remove all tangles. Tangled hair makes a messy braid. Use a wide tooth comb. Start from the ends. Move up slowly.
Step 2: Gather Hair into a Ponytail
Gather all hair at the back of your head. Tie it with a soft rubber band. This keeps hair in place. It makes braiding easy. You can also do it without a ponytail. But start with a ponytail first. It is easier.
Step 3: Divide into Two Parts
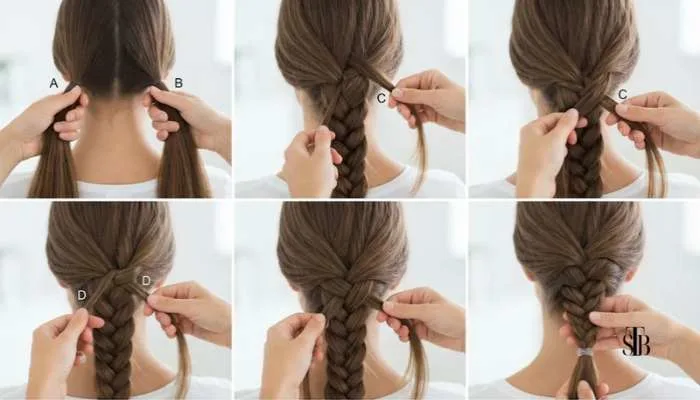
Split the ponytail into two equal parts. Left part and right part. Hold one part in each hand.
Step 4: Take a Thin Strand from the Left
From the outer edge of the left part, take a thin strand. Thin means thin. Not thick. Thick strands make the braid chunky. Thin strands make it look neat.
Step 5: Cross It to the Right
Take that thin strand. Cross it over. Add it to the right part. Hold it with the right part.
Step 6: Take a Thin Strand from the Right
Now from the outer edge of the right part, take a thin strand. Cross it over. Add it to the left part.
Step 7: Repeat
Keep doing this. Left strand to right. Right strand to left. Left to right. Right to left. Over and over. The braid will start to form. You will see the fish tail pattern.
Step 8: Tie the End
When you reach the end, tie it with a small rubber band. Leave a small tip of hair below the band. This looks nice.
Step 9: Pull the Braid Apart
This is the secret step. Hold the braid at both ends. Gently pull the edges outward. Do this on both sides. The braid will look thicker and fuller. Do not pull too hard. Just a little.
Step 10: Cut the Top Band
If you used a ponytail band at the top, cut it now. Do it carefully with small scissors. Do not cut your hair.
Your fishtail braid is ready.
Fishtail Braid Step by Step with Pictures
I cannot put pictures here. But I will tell you how to find them. Search on Google for "fishtail braid step by step with pictures." You will find many clear photos. Look at the pictures while you read these steps. It will help.
Here is what to look for in the pictures:
- Picture 1: Hair tied in a ponytail. Split into two parts.
- Picture 2: A thin strand taken from the left side.
- Picture 3: That strand crossed over to the right.
- Picture 4: A thin strand taken from the right side.
- Picture 5: That strand crossed over to the left.
- Picture 6: The pattern forming in the middle.
- Picture 7: The finished braid. Tied at the end.
- Picture 8: The braid pulled apart to look thick.
Watch a video also. Videos help more than pictures. Search "fishtail braid tutorial" on YouTube. Watch one video three times. Then try it yourself.
Fishtail Braid Hairstyle with Beads
Beads make the braid look festive. This is great for weddings. It is also good for Navratri and Diwali. Here is how to add beads.
What You Need?
- Small beads with big holes
- A needle with a big eye
- Thread or a thin wire
How to Add Beads?
Method 1: Beads on Strands
- Make the fishtail braid as usual
- Stop when you reach the middle
- Take a bead
- Thread it on a thin strand of hair
- Push it up near the braid
- Continue braiding
- Add more beads as you go
Method 2: Beads at the End
- Make the full braid
- Tie the end
- Take a few beads
- Thread them on the hair below the band
- Tie a small knot to hold them
Method 3: Beaded Pins
- Make the braid
- Take small pins with beads on top
- Push them into the braid at different points
- This is the fastest way
- No threading needed
Bead Colour Ideas
- Gold beads for weddings
- Red and green beads for festivals
- White pearls for a soft look
- Silver beads for parties
- Colourful beads for functions
Match the beads with your outfit. It looks lovely.
You May Also Read: Easy Hairstyles for Long Hair You Can Do Yourself in Minutes
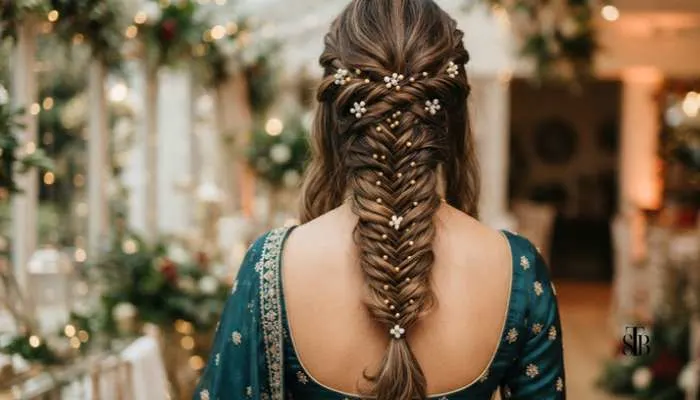
Fish Braid Hairstyle Indian
Indian hair is mostly thick and long. This is perfect for a fishtail braid. Thick hair makes the braid look full. Long hair gives you more braid to work with.
Here is how Indian ladies wear it:
1. With Saree
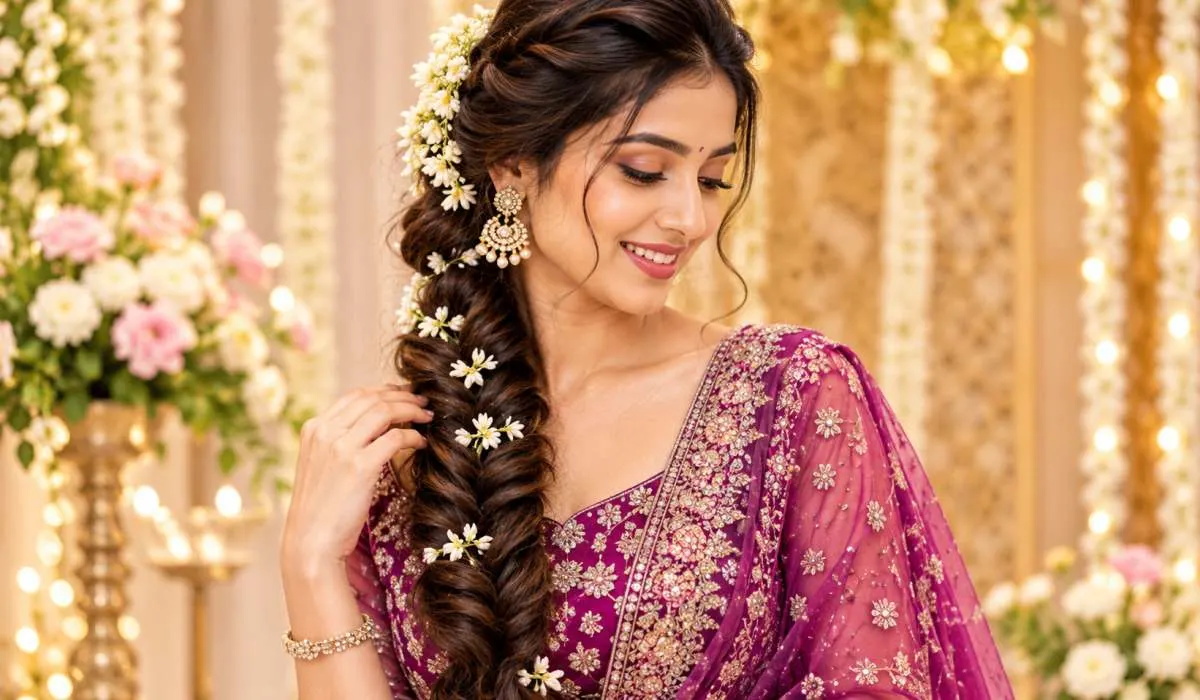
A side fishtail braid with a saree looks beautiful. Add jasmine flowers at the top. Add gold beads at the end. This is perfect for weddings and receptions.
2. With Lehenga
A tight fishtail braid with a lehenga looks royal. Add a maang tikka. Add small pearl pins in the braid. This works for brides and bridesmaids.
3. With Salwar Suit
A loose fishtail braid with a salwar suit looks simple and pretty. Good for daily wear. Good for college. Good for office.
4. With Gajra
Indian ladies love gajra. Wrap jasmine flowers around the top of the braid. This is an old style. It still looks fresh. Great for festivals.
5. For Karwa Chauth
A fishtail braid with flowers and beads is popular on Karwa Chauth. Add a nice hair accessory. Wear it with your best saree.
6. For Navratri
Add colourful beads. Add flowers. Wear it with a chaniya choli. It looks festive and fun.
Tip for Indian hair: Indian hair can be oily. Wash it the day before. Dry hair holds the braid better. Oily hair makes the braid slip.
Common Mistakes to Avoid
Many people make these mistakes. Avoid them.
- Taking thick strands. Thick strands make a chunky braid. It does not look like a fishtail. Take thin strands only.
- Braiding too tight. A tight braid looks thin. Keep it a little loose. Pull it apart at the end.
- Not brushing first. Tangled hair makes a messy braid. Always brush first.
- Rushing. Slow is fast here. Go slow for the first few tries. Speed comes with practice.
- Pulling too hard at the end. Gentle pulls only. Hard pulls make the braid lose shape.
- Using a thick rubber band. Thick bands look ugly. Use thin bands that match your hair colour.
Tips to Make It Easier
- Use a ponytail first. It keeps hair in place. Remove the band at the end.
- Wet your hands. Slightly damp hands grip hair better. Dry hands make hair slip.
- Practice on a friend. Practice on someone else first. It is easier to see what you are doing.
- Use a mirror. A double mirror helps. You can see the back of your head.
- Try a side braid first. Side braids are easier to see and do. Move to back braids later.
- Watch videos. Watching someone do it helps more than reading. Watch and pause. Then try.
How Long Does It Take?
- First time: 15 to 20 minutes.
- Second time: 10 minutes.
- After one week of practice: 5 minutes.
- After one month: 3 minutes.
It becomes fast with practice. Do not give up after one try. Everyone's first braid looks bad. That is normal.
Final Words
The fishtail braid hairstyle is not hard. It only looks hard. You need two parts. You need thin strands. You need to cross left to right and right to left. That is all. Practice five times. You will master it.
For Indian functions, add beads and flowers. It looks lovely with a saree or lehenga. For daily use, keep it simple. A loose fishtail braid looks soft and pretty.
Search for pictures and videos. Watch them. Then try. Take your time. Do not rush. Your first braid may look messy. Your second will be better. Your fifth will look perfect.
So pick up your comb. Tie a ponytail. Start braiding. You can do it. It is easy. It is fun. And it looks beautiful.
FAQs
1. How long does a fishtail braid take?
First try takes 15 to 20 minutes. Second try, 10 minutes Practice for a week, 5 minutes after a month, 3 minutes. Speed comes with practice. Do not give up after one try everyone's first braid looks messy. That is normal.
2. Why does my braid look thin?
You are taking thick strands. Take thin strands only thin strands make the pattern neat also pull the braid apart gently at the end hold both ends. Pull the edges outward on both sides. The braid will look fuller do not pull hard Just a little.
3. Can I do it on short hair?
Yes, if your hair reaches your shoulders. Shorter hair makes a shorter braid. That is fine. It still looks good very short hair will not work. You need at least shoulder length. If your hair has layers, it may stick out use pins to hold the loose bits.
4. Do I need a ponytail band to start?
No, but it helps. A ponytail band keeps hair in place. It makes braiding easy for beginners. Tie the ponytail first. Braid down then cut the top band carefully at the end. Once you get good, you can skip the band but start with it.
5. My braid keeps slipping. What do I do?
Your hair is too smooth or oily. Wash it the day before. Do not use conditioner on the day you braid, Slightly damp hands help rub a little water on your palms. Dry hands make hair slip also do not braid too loose at the top. Keep the first few crosses firm.
6. Can I sleep with this?
Yes. A loose fishtail braid is good for sleeping. It stops tangles. It gives soft waves in the morning. Do not tie it tight, A tight braid causes headache. Use a soft band at the end. In the morning, open it slowly. You will get nice natural waves.
7. How do I add beads to the braid?
Three ways. One, thread beads on a thin strand and push them up as you braid. Two, thread beads on the hair below the end band. Three, use pins with beads on top and push them into the braid. The pin method is fastest. Match bead colour with your outfit. Gold for weddings, red and green for festivals.
8. Is it good for Indian weddings and functions?
Yes. It is perfect. Indian hair is thick and long. That makes the braid look full. Add jasmine flowers at the top. Add gold beads at the end. Wear it with a saree or lehenga. It looks royal. For Karwa Chauth and Navratri also it works well. Just add flowers and colourful beads.